Fuse the interfacing to the wrong side of your two front panel/facing pieces (piece J).
OPTIONAL: Although this wasn't done on the screen-used Reed ENT undershirt photographed and shared by Mike Paugh, we recommend serging the outer (longer, curved) edges of the front panels/facings for two reasons. First, it will help prevent the edges curling (as cotton lycra tends to do), which will in turn help prevent impressions of the facing edge being seen on the right side of the garment, and second, all the other interior edges appeared to be serged, so why leave out these edges?
Prepare the shirt body assembly by turning it right side out.
Each side will be done separately, so we'll start with the right side.
Fold the remainder of the shirt body assembly out of the way so only the right front is accessible.
Place the front panel/facing on top of the right front, with centermost edges flush and right sides together.
NOTE: Although the pattern pieces were drafted to precisely match, we've noticed that after interfacing the front panel/facings and lightly pressing the fronts, the front panel/facings sometime end up a little bit shorter than the front edges of the body! If you find this to be the case, don't panic! The important thing is that the facings are the same size as each other. If there's some excess at the bottom of the undershirt, just cut it off. You won't miss it.
Sew the front panel/facing to the front along the centermost edge.
Serge the seam allowances.
Press the front panel/facing toward center.
On the underside, press the seam allowances toward center.
Repeat for the other side.
Press the front panel/facing under on the fold line.
(We're just pressing a crease for now, not permanently securing it.)
TIP: The fold line is 1 ¼" from the body/front panel seam line.
TIP: Using a see-through ruler, mark the fold line with white tailor's chalk (testing on a scrap first to ensure it disappears when ironed, of course).
Once pressed, the front panel should be exactly 1 ¼" wide.
However, the distance from the fold to the raw (serged) edge of the "facing" should be exactly 1 ⅝" - that is, along the lowermost portion of it until it begins to curve outward toward the collar facing.
Repeat for the other side.
Unfold your front panels/facings.
Place the two facings right sides together along the center back (short) edges, then sew them together at the center back.
Press the seam allowances open.
Pin the "collar facing" (the upper portion of the front panel/facing) to the collar along the upper edges of each, matching center backs and right sides together.
To accomplish this, you'll need to fold the front panel back in on itself, right sides together, which may be a bit difficult since you previously pressed/creased it in the other direction.
TIP: Ensure that the front panel remains exactly 1 ¼" wide by measuring from the body/collar/front panel seam line to the folded edge of the fabric and pinning in place before sewing. (It's okay for it to measure a tiny bit less than 1 ¼" to account for the resistance caused by the opposite crease you pressed earlier.)
Sew the "collar facing" to the collar along the top edges, reinforcing the stitch several times at the upper corners (where you started and stopped sewing).
Remove bulk at the upper front by cutting out the seam allowances between the folded edge and the collar/front panel seam allowances.
Turn the facing back under, poking out the corners as sharply as possible and pressing the collar/facing seam line so it's nice and crisp.
Press the folded edge of the front panel again.
OPTIONAL: Understitch the collar/collar facing seam allowances to the collar facing as far as possible. Unlike with the VOY undershirts and DS9/NEM division shirts, though, we actually don't recommend doing this, since the whole purpose of the undershirt's facing seemed to be to hide any interior construction details.
Your front panels should be exactly 1 ¼" wide.
TIP: Make sure they're the same (proper) width before continuing, adjusting and pressing as needed.
After (or perhaps, while) ensuring the front panels are exactly the correct width, pin the facings to the front of the body along the body/collar/front panel seam line.
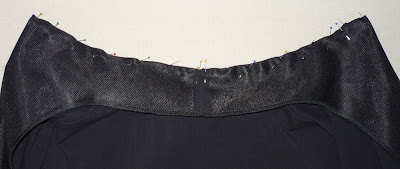
Pin the "collar facing" to the back collar along the lower edges, matching center backs.
Secure the back "collar facing" to the back collar by stitching over the previous stitch line for a few inches in each direction of the center back. It doesn't particularly matter how far, but we generally recommend stopping approximately 1" before the shoulder seams.
The interior back of your undershirt should now look something like this.
PREVIOUS: Tutorial, part 3 - Collar to Body


No comments:
Post a Comment